About Paul Ray Effinger ® Art Foundry
Artist's Bio
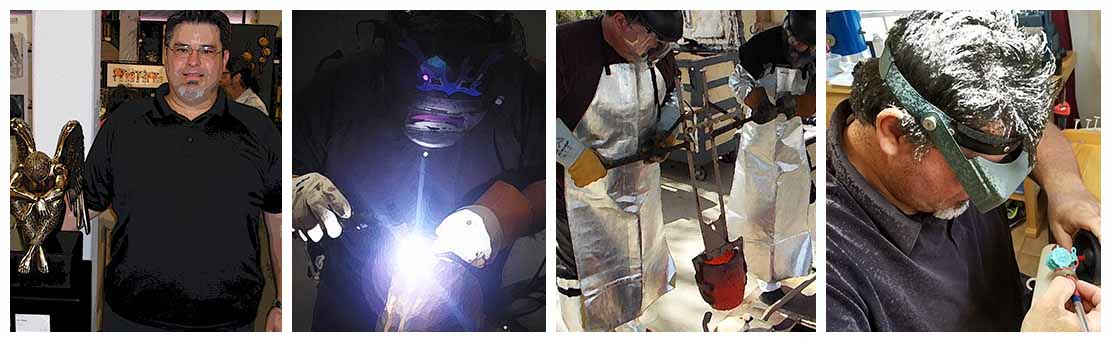
Paul was born in Ft. Worth Texas, the youngest of seven children. At age 13, he apprenticed in his father's workshop repairing heavy machinery until entering college at UT Austin in 1984, majoring in Mechanical Engineering. He worked the following decade as a Lead Mechanical Engineer at Texas Nuclear. Switching careers in 1995 to follow his passion for art, he became a Lead Character Artist and Art Director in the gaming industry the next decade. In 2005, Paul retired from professional work and began figurative sculpting. Building his own foundry in 2008, he mastered the art of lost-wax casting in precious metals, taught by the legendary master John Kasson. Recently, he's focused on custom jewelry and pistol grip designs.
Artist's Statement
I've been an artist and engineer most of my life. Early on I was fascinated by figurative art. Masterpieces by DaVinci, Michelangelo, Bernini, and the ancient Greeks inspire me to this day. My art focuses on the human form.. for me, nothing rivals its beauty and mechanics.
My mom was a devout Catholic and taught me about faith. My father was a master mechanic and instilled the German philosophy of quality in my work. My art combines faith with engineering. Twenty years ago I started sculpting classical figures in bronze and built my own foundry. Few sculptors cast their own designs as I do, but I enjoy having complete control over the quality of my work.
Sculpting's easy compared to the work required to reproduce it in bronze! Foundry work is precise, technical, tedious, time consuming and expensive. So many steps must come together perfectly with little room for error, and mistakes are costly. Staring at molten bronze above 2000 °F is mesmerizing and when the pour goes right it's amazing! It's taken me a long time to cast with perfection. Yet, I'm always learning and improving.
I learned much from second-generation foundry master John Kasson. Working as an engineer and character artist for three decades, I designed numerous precision organic digital character models using hi-end CAD software, acquiring a vast array of modeling techniques. I now use those skills in my designs and foundry work.
I design sculpture and jewelry using Autodesk 3D Studio Max and Pixologic ZBrush. Coupled with my Solidscape 3D ultra-resolution wax printer, I can create jewelry and grips that have insane detail in the castings!
God Bless.. Paul Ray Effinger
Public Exhibitions
- 2015 Texas Art Hop, Georgetown, TX
- 2014 Texas Art Hop, Georgetown, TX
- 2014 Catholic Diocese of Austin Sacred Art Gallery, Exhibit XII, Austin, TX
- 2013 Texas Art Hop Juried Competition: Best of Show, "Volnus", Georgetown, TX
- 2013 Texas Society of Sculptors, Juried Competition: 2nd Place, Fredericksburg, TX
- 2010 Catholic Diocese of Austin Sacred Art Gallery, Exhibit IV, Austin, TX
- 2008 Austin Museum of Fine Art, Fall Show, Austin, TX
- 2007 Texas Society of Sculptors Sculptfest, Umlauf Sculpture Garden, Austin, TX
- 2007 Texas Society of Sculptors Spring Exhibition, Flat Creek Winery, Lago Vista, TX
- 2006 Texas Society of Sculptors Sculptfest, Umlauf Sculpture Garden, Austin, TX
Resume
Education: University of Texas at Austin: Mechanical Engineering
Work Experience: Figurative Sculptor, CAD Designer, & Bronze Founder (2007 - Present)
- Master Figurative Bronze Sculptor
- Designed and built my own Fine Arts Bronze Foundry with Ceramic Shell Technology
- Specialized in Precision Bronze and Precious Metals Casting from Digital Media
- Specialized in Ultra-Resolution Precision Organic 3D CAD Modeling, 3D Printing & Prototyping
- 30 years of Mechanical Engineering & CAD Design Experience
Freelance Senior Character Designer & Independant Game Development Contractor (2004–2007)
- Independant Contractor for Liquid Development Studios for several years
- Completed numerous freelance game development contracts as Senior Character Designer
Lead Artist, Ionstorm, Austin, TX (5 September 2000 – 15 October 2003)
- Lead Character Artist and Animator on Deus Ex II published on the X-Box platform by Microsoft.
- developed actors’ script and directed mocap sessions with Locomotion Studios.
- developed advanced layering procedures for application of mocap using Character Studio and Max.
- developed skeletal specs and techniques to implement characters and animations into the Unreal Warfare Engine
- developed facial animation specs and implementation using Lipsync and Impersonator facial packages
Lead Artist, Digital Anvil, Austin, TX (5 January 1999 – 5 September 2000)
- Lead Character Artist and Animator on Brute Force published on the X-Box platform by Microsoft.
- developed actors’ script and directed motion capture (mocap) sessions with Locomotion Studios.
- developed advanced procedures for application of mocap using Character Studio and Max.
- developed skeletal specs and techniques to implement real-time patch-charactors into the Brute Force engine
Lead Artist, Hypnos Entertainment, Austin, TX (1 June 1998 – 31 December 1998)
- Lead Character Artist and Animator on Jack Nicklaus 6 Golden Bear Challenge published by ActiVision March, 99.
- designed, modeled, textured, and animated all 3D golfer models using mocap provided by the House of Moves.
- directed and coordinated all character artwork used in the game.
- developed all procedures for application of mocap using Character Studio 2.0 and Max.
Art Director, Eclipse Entertainment, Austin, TX (3 February 1997 - 31 May 1998)
- responsible for: recruiting, scheduling, and directing the art staff; researching, evaluating and recommending software tools for the art dept.; and directing motion capture sessions. Other responsibilities included: creating, mapping and texturing low-poly nurb models for real-time gameplay; developing specs for skeletal hierarchies and specs for our in-house skeletal deformation system; training the art staff on how to attach and correct motion capture data applied to single-skinned models using 3D Studio Max and Character Studio.
- Lead Character Artist and Animator for Jack Nicholas Golf 5 published by Accolade 11/97
Lead Artist, Maxis South, Austin, TX (13 May 1996 - 1 February 1997)
- Lead Artist for Marble Drop published by Maxis April '97.
- created all palettes, 3D and 2D special effects
- created complex, mapped, and textured 3D meshes used for pre-rendered images
- developed the methods to use custom palettes for the game
- determined viewport angles for isometric rendering and 3D space requirements to construct puzzles
Lead Mechanical Engineer, Texas Nuclear, Austin, TX (7 November 1988 - 16 February 1996)
- Lead Engineer in Mercuric-Iodide Semiconductor Laboratory
- designed precision lab equipment in a high-tech environment for creating semi-conductors
- maintained all digital controllers, furnaces, high-vacuum systems, environmental controls, and computers
- performed data analysis for senior engineers and scientists
About Effinger Art Foundry
My sons and I manufacture all of my sculpture and jewelry designs in our foundry workshop. Both processes are similar and require a high degree of precision for good castings. Jewelry is often small and can be made in days but larger sculptures can take months to complete. The discussion below is for my sculpture process only.
Bronze Casting
The lost-wax process is a highly skilled art and dates back millennia to the ancient peoples of Persia, Egypt, China and Greece. It basically uses a heat-resistant mold formed around a wax sculpture which is baked to remove the wax, then replaced by molten metal poured into the void. It's very accurate, and will reproduce the tiniest details in the castings. Although the ancient process is generally the same as that used today, significant modern advances include computer-aided-design (CAD), 3D printing, milling, standardized alloys, waxes and ceramic shell technology. The lost-wax process is precise, tedious and labor-intensive and why it's expensive. The sculpture is basically reproduced three times in different media: the original, the wax copy, and the metal copy. 100's of hours of labor culminate in the last critical minutes of pouring bronze and failures are costly. Every step must function perfectly; much can go wrong, but when right it's exhilarating!
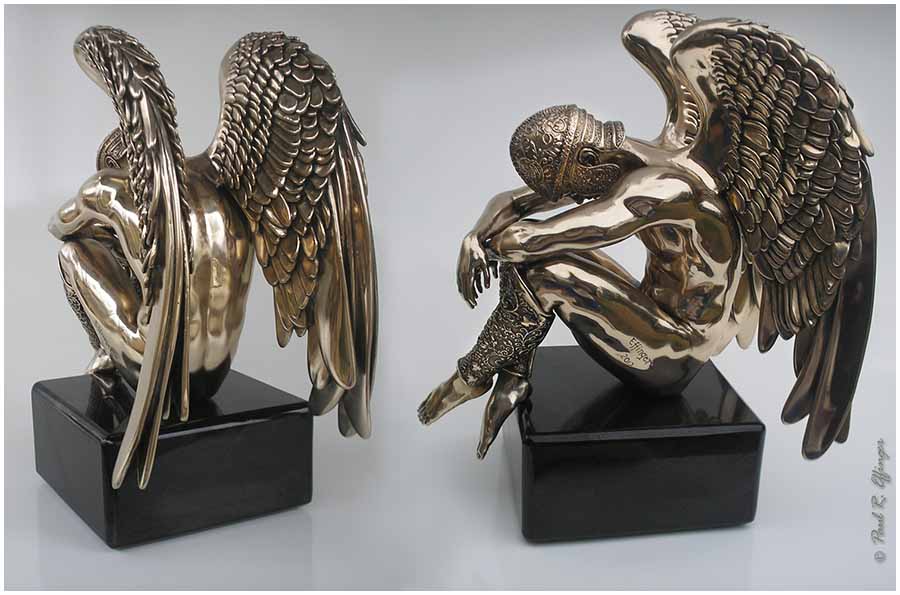
How I Made Volnus:
The Sculpture Model
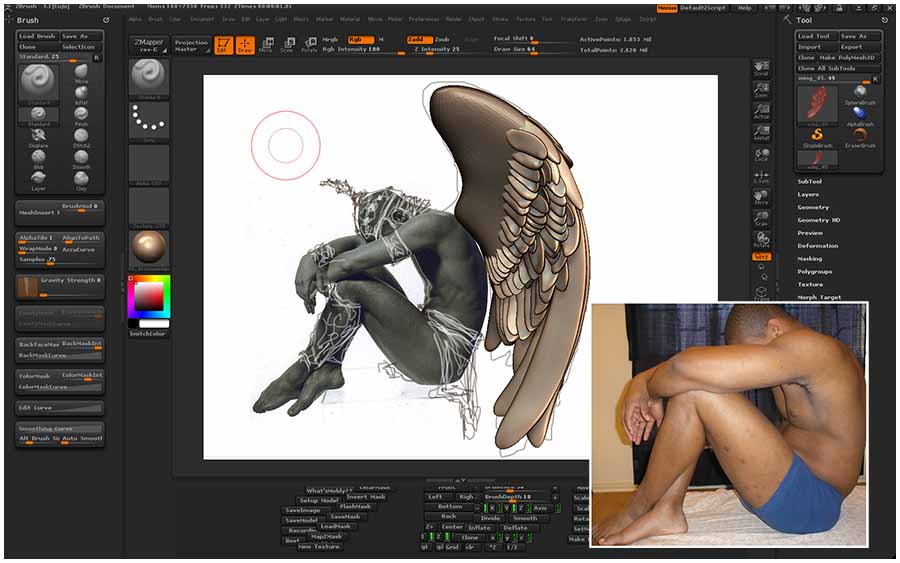
I use traditional art skills, mechanical engineering, digital technology and live models to create my sculptures. Sometimes I sculpt the model in clay, but I prefer creating them digitally and 3D printing when possible. Sculpting and designing digitally can save months of time when creating a sculpture. I can do things digitally that take forever to do by hand in clay. Precision is much higher digitally since you can zoom in as much as desired to add detail. The drawbacks are the high print costs and the long learning curves to master the software.
Generally, I don't wish to create an exact likeness of the model, but rather use their natural beauty to serve as an anatomical foundation for what I'm designing or creating. Below is the CAD model of my Volnus sculpture which I designed using Max and ZBrush modeling software.
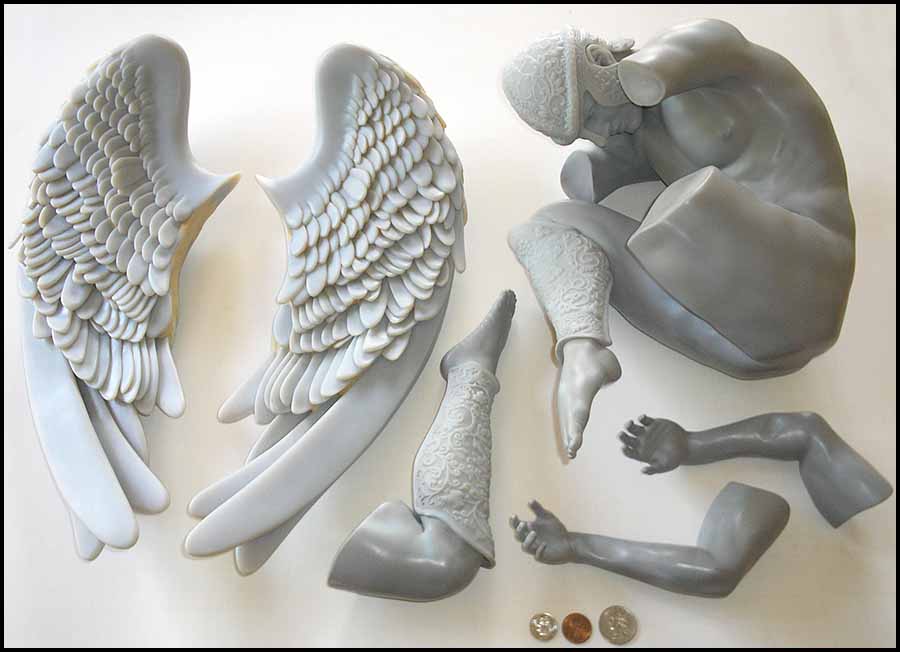
3D Ultra-Resolution Printing
Hi-resolution 3D Printing and CAD modeling have changed the face of modern manufacture. I was introduced to 3D printers at my first engineering class at UT Austin in 1984. Below are the ultra-resolution prints I created for my 18" high, limited bronze edition of Volnus. The model was printed for 90 hours on a Connex large printer with a vertical Z-axis resolution of 16 microns. The material is an ABS plastic, hard but brittle, but easy to work with. I sanded the parts (after this photo was taken) with automotive sandpaper, alternating with coats of sandable gray primer, producing a very smooth model, that I molded in rubber (see next section).
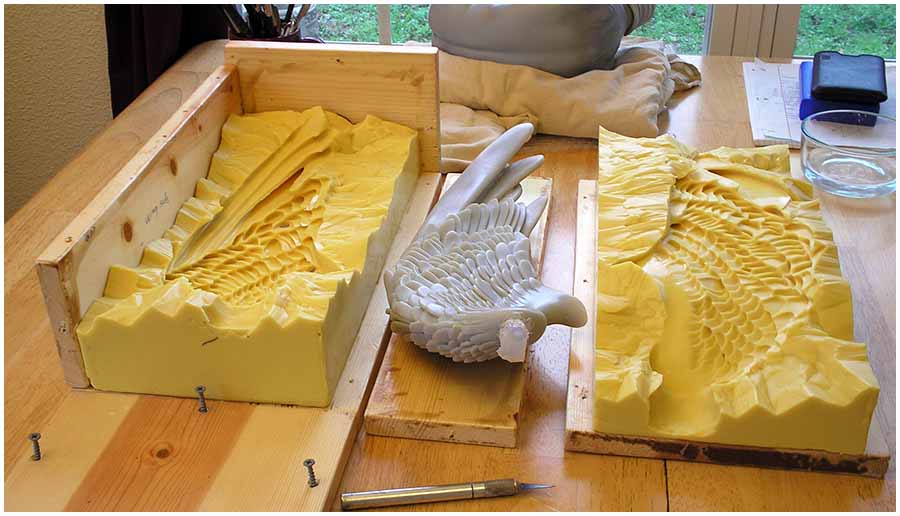
Creating The Rubber Mold
In order to reproduce an artwork in bronze using the lost-wax method, it must first exist in wax form. This usually means creating rubber-molds of the artwork and often dividing it into several pieces (as shown above) to cast it properly. Making molds is generally the most time consuming and costly step of the foundry process and an art in itself. Well-made molds are critical to the success of good castings. Careful study determines the best way to divide the artwork for molding. Precision rubber molding requires vacuuming to reduce bubble defects on the mold's surface. The rubber is then brushed, sprayed, or poured onto the sculpture, then backed by a rigid "mother-mold" (of plaster, fiberglass, or wooden frame) which holds the rubber in place once the sculpture is removed and wax poured into it to make the wax-positive. Often the original is destroyed once removed from the mold, so sometimes you only get one chance to make it right.
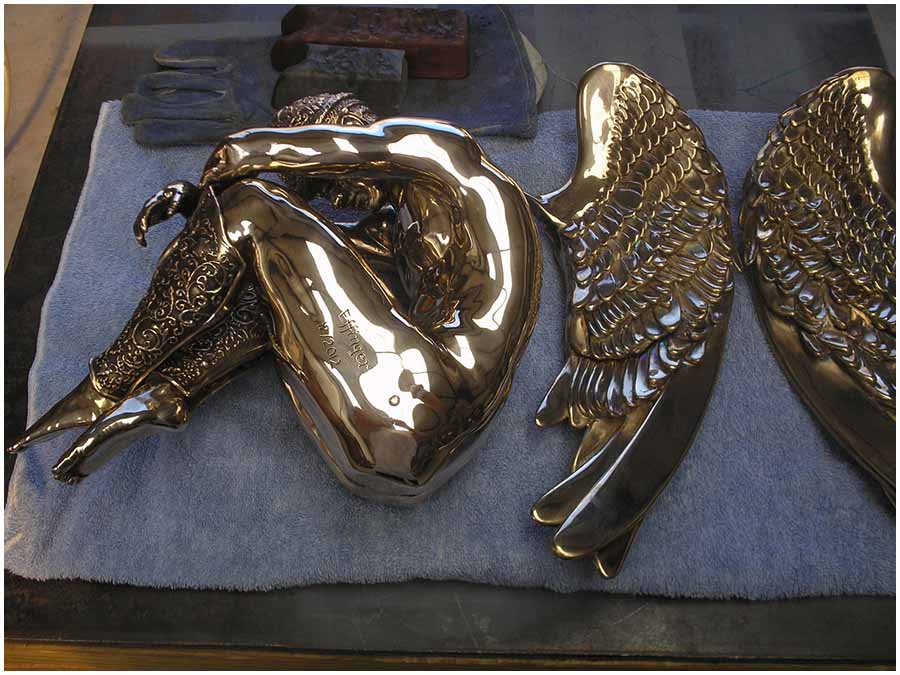
The Wax Positive
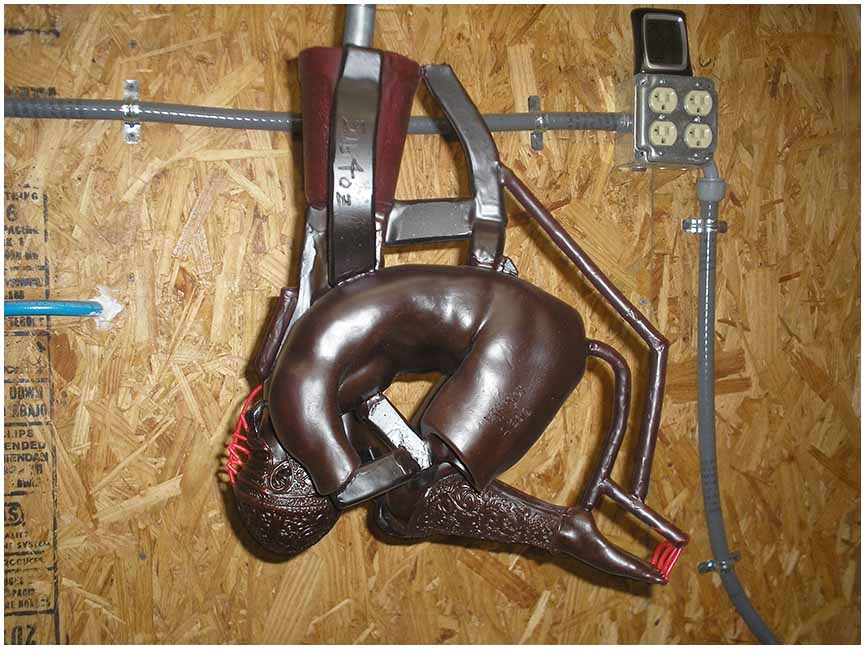
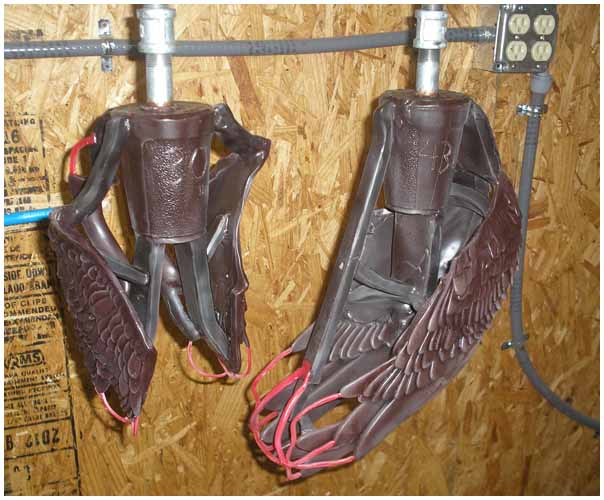
To cast bronze properly it generally needs to be cast as a hollow shell. This beneficially minimizes weight and expense. As bronze solidifies, it contracts and "pulls" away from areas still molten. Smaller or thin masses (i.e. the sculpture masses) need to solidify before larger masses (i.e. heat sinks such as the funnel and main sprue). Hollowing ensures large surface areas of the sculpture dissipate heat quickly and solidify first. A hollow wax-positive is made for larger pieces by pouring hot liquid wax into the mold, rolling it around to coat the inner walls of the mold where it condenses, then poured out. This is repeated a number of times until a shell of wax is formed on the inside of the rubber-mold. The thickness of the wax shell represents the final bronze thickness. When the wax cools, the mold is opened and the wax-positive removed. Waxes of various hardness, melting point, and color are used for different purposes, sometimes mixed together. Below are some of the hollow wax positives for Volnus, i.e. the body and wings prior to spruing. All imperfections (e.g. pinholes, bubbles, cracks, etc.) have been fixed. The body and legs have had sections removed to facilitate the ceramic slurry for the investment (see below); these plates will be welded back on after casting.


The Wax Tree
Wax positives and wax trees are thoughtfully and carefully designed to provide molten bronze to the parts being cast. A large funnel at the top feeds the sculpture below via "sprues" and acts as a heat sink, The trick is to get everything to solidify before the funnel. The last part to solidify contracts and voids dramatically, and you want this to be in the funnel that's cut off later. The funnel also pools impurities and gas bubbles which rise to the top while everything is still molten. The wax tree has "gates" directing molten bronze downward to the sculpture and "vents" allowing gases to escape upward and route back to the outside top of the funnel. The bronze flows in a cylindric path, kind of like blood in our bodies, traveling from the heart or funnel, downward through the center, through all the extremeties, and back up again towards the top of the funnel. This makes a good casting.
The Investment (Ceramic Shell)
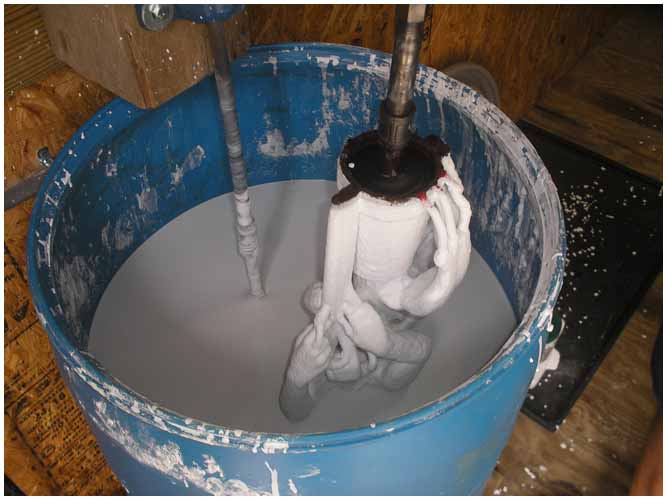
The wax tree is sealed with shellac spray or dipped in a degreaser (pattern wash) prior to investment, so the slurry adheres to it well. The tree is then dipped in a large vat of ceramic slurry and immediately coated with refractory stucco (fused silica) and allowed to dry. The slurry is made of microscopic colloidal-silica-binder mixed with refractory-flour, wetting-agent, and anti-foam.
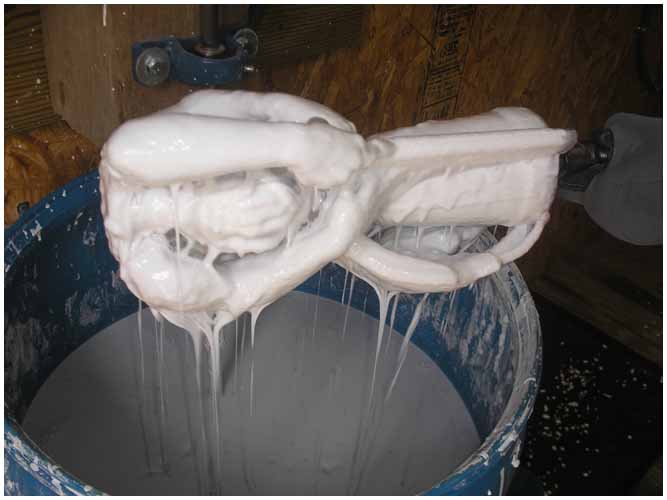
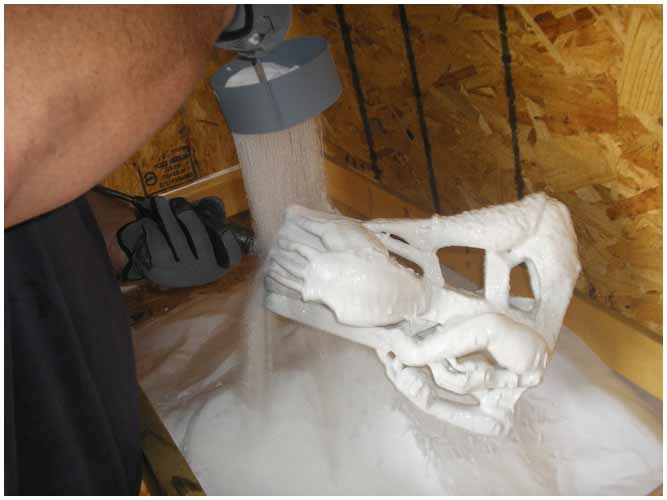
This is repeated 8-10 times as necessary over several days to build a ceramic shell mold thick enough to withstand the forces of molten bronze required for the casting. The first coats are coated with a fine stucco to capture detail, followed by a course stucco to build thickness. The shell becomes heavier, thicker, and stronger with each successive dip. Basically, each foundry has its own unique procedures, techniques and recipes to create the shell, to accomodate different castings, but they're still similar.

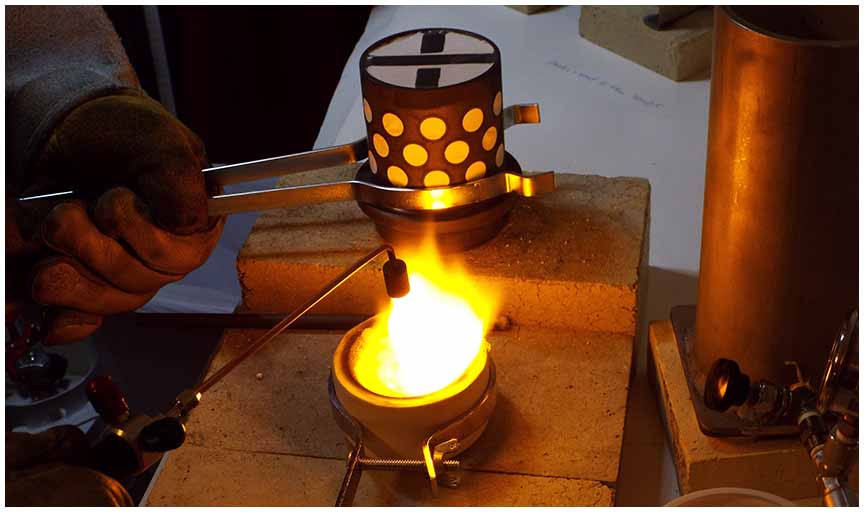
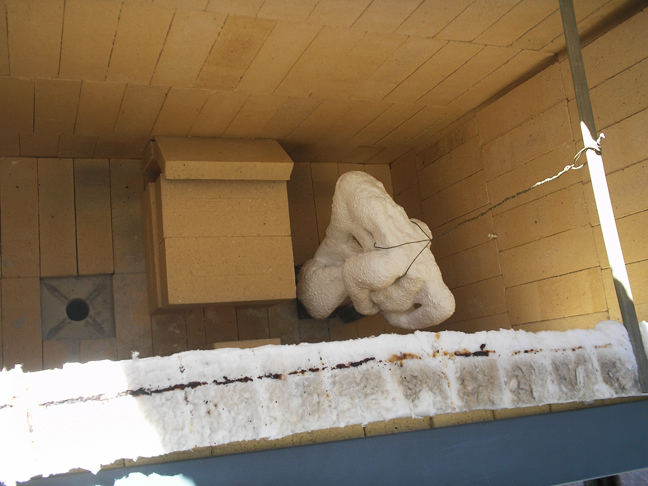
Burnout
The ceramic shells are then placed in a flash kiln at 1400 F where the wax and water are thoroughly burned out or "lost" in a matter of minutes, and they solidify and strengthen. The burned ceramic shells become lightweight (through lost wax and water), have very fine surface detail, can withstand extreme thermal shock, are very porous, dissipate heat quickly, brittle but quite strong, and easily devested from the bronze castings. After burnout, the investments are cooled, inspected, and any cracks are patched.
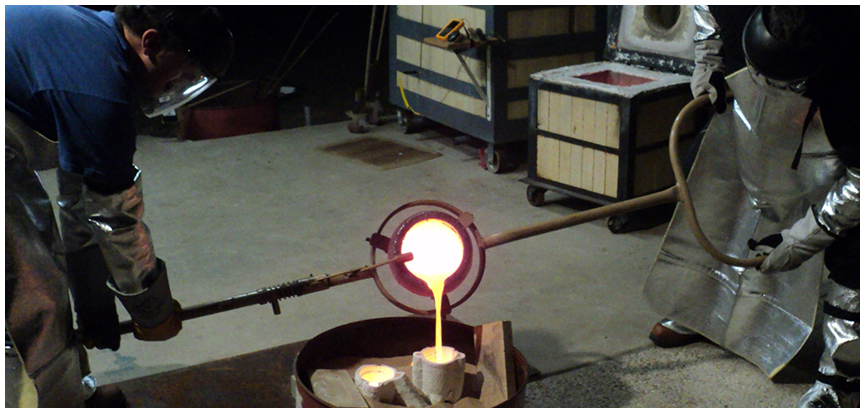
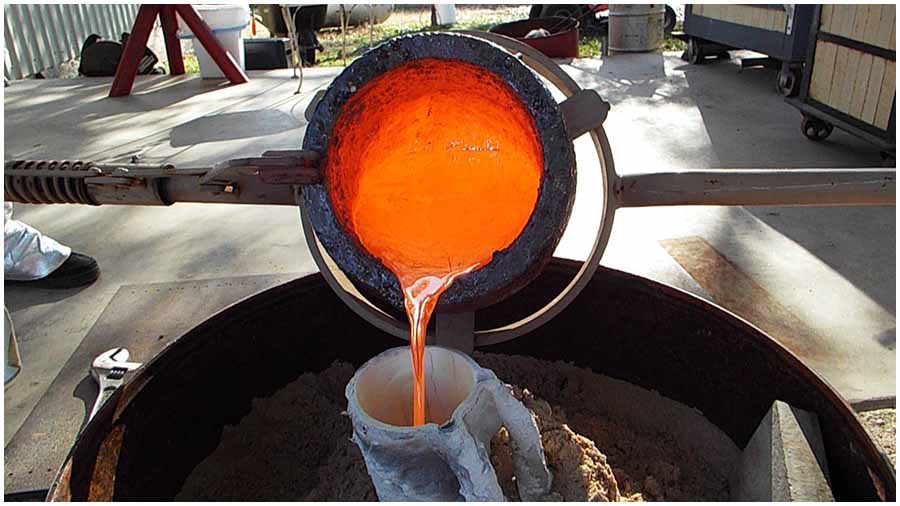
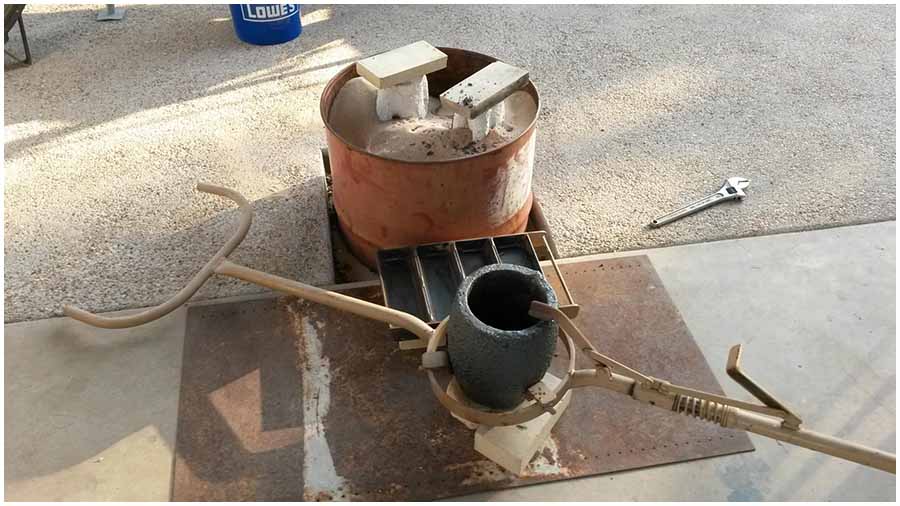
The Pour
It takes roughly an hour to melt the bronze depending on the amount charged. The crucible is placed into the gas-fired furnace and charged with the proper amount of bronze. Once the furnace is ignited, air/fuel mixture is adjusted and the furnace roars as the bronze is heated. The ceramic shells are placed in the kiln and pre-heated to to receive the molten bronze. Slag is removed from the top of the liquid bronze (where it collects) using a steel skimmer. Temperature is measured with a digital tungsten pyrometer immersed into the metal. Once the target temperature of the bronze is reached, ~ 2000 F, then the magic happens quickly. The kiln and furnace are shut off and the glowing hot investments are removed from the kiln with kevlar gloves and supported in a bed of sand. The glowing hot crucible radiates unbelievable heat and protective clothing is required. It's lifted from the furnace by two foundrymen and placed onto a firebrick on the floor, inside a pouring/lifting shank. They then lift the shank, which grabs the crucible below its bulge, lock it in place with a lever, and hoist it above the lip of the ceramic investments where the molten bronze is carefully poured in, slowly enough to allow gases to escape. Sometimes, several investments are filled with a single charge, or the crucible may be recharged for more pouring. After pouring, any excess bronze is poured into ingot molds for later reuse, and the crucible scraped out, and cooled.
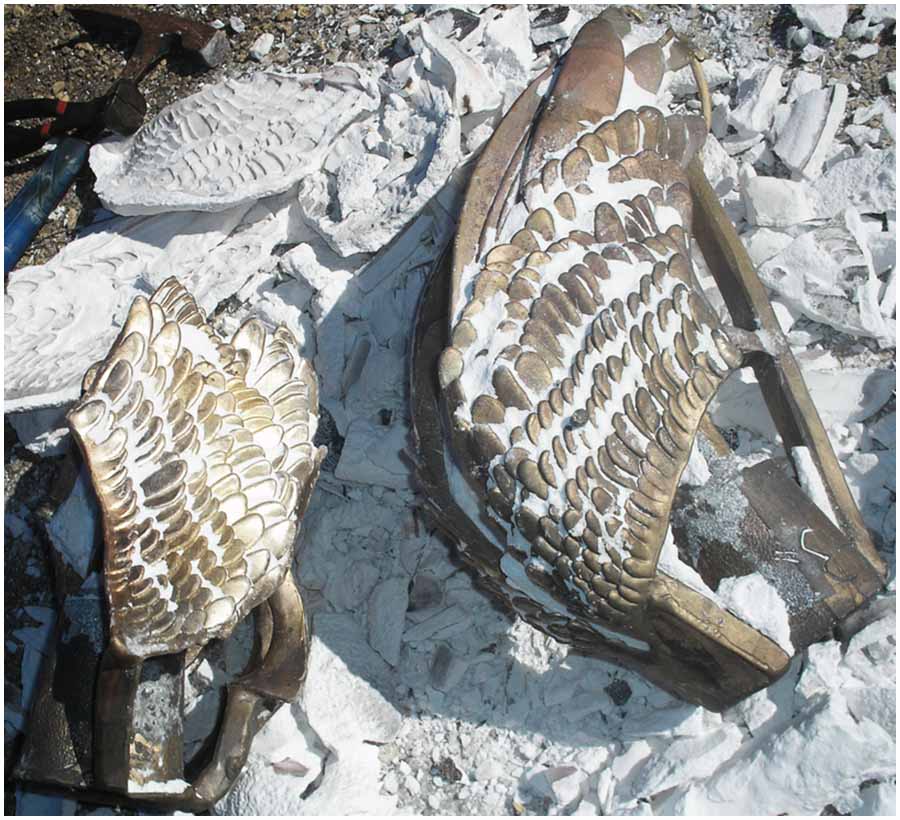
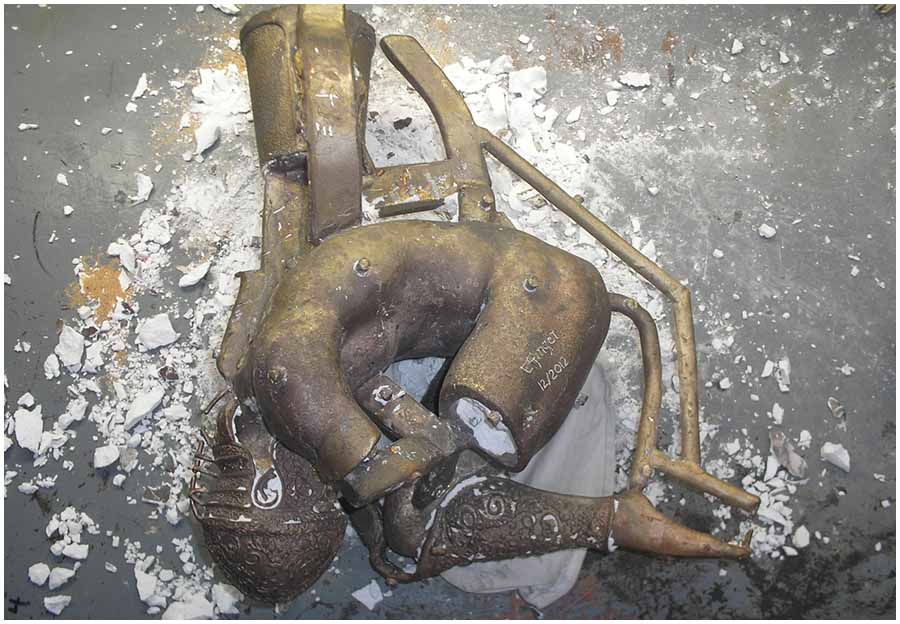
Devestment
As the casting cools about half an hour, the ceramic shell begins to crack and is easily devested from the bronze by tapping/chipping with a hammer or pneumatic hammer. When thoroughly cooled, all ceramic is removed, bronze sprues are cut off, and pieces are separated. The bronze scrap is recycled. The ceramic shell provides an extremely fine surface on the bronze.
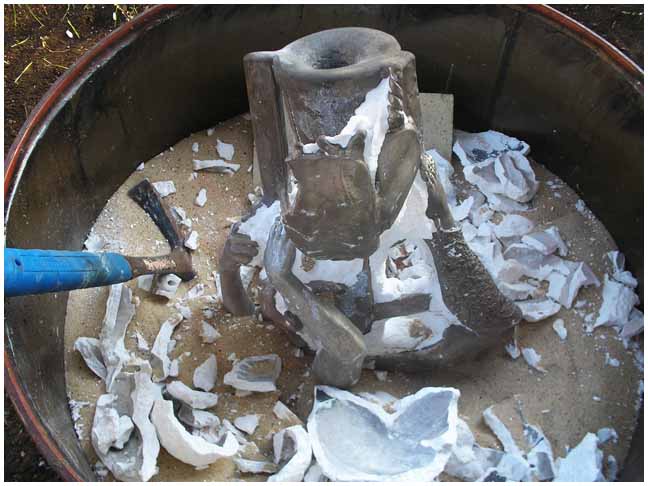
There's so much that can go wrong, but when it goes right it's awesome. The body casting on Volnus was complex but came out superb.
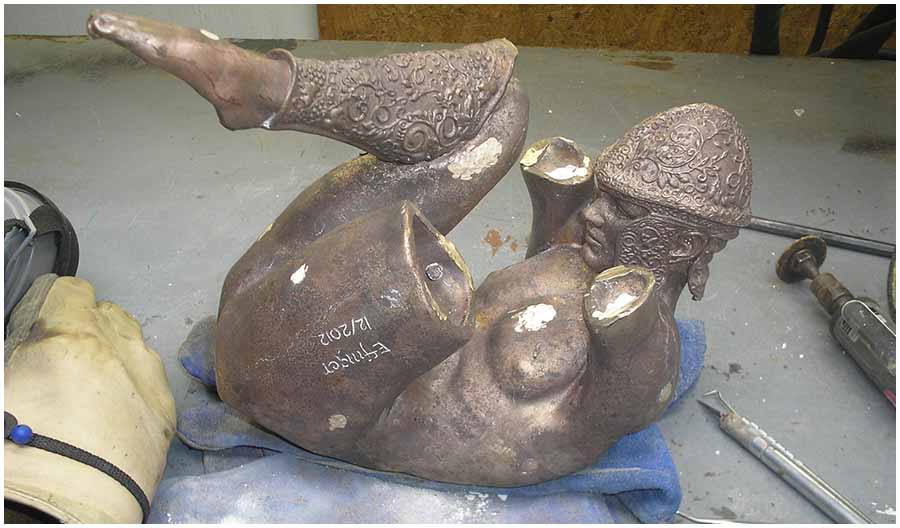
Chasing
Surface defects are chased, welded, cleaned, polished, and multiple cast pieces are TIG welded together. This can take hours, days, or weeks, depending on the size and complexity of the sculpture, and how much effort is needed to smooth the surface. Below, the body sprues have been chased or cut off using various metal grinders and cutting wheels.
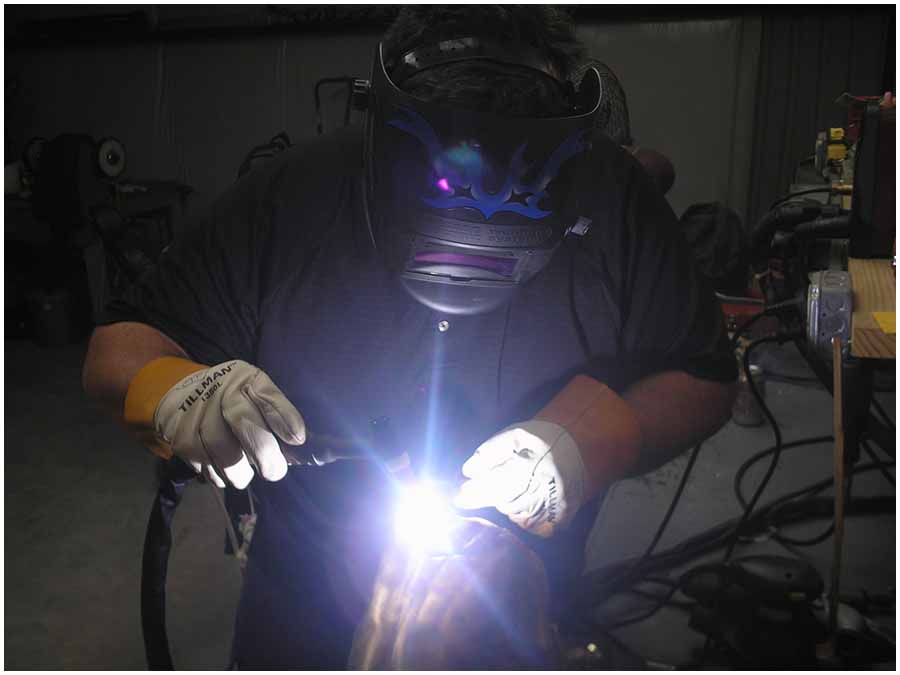
Welding
Below, I'm welding the back plate onto the body. Each piece is welded on, chased and polished, until the entire sculpture is assembled.
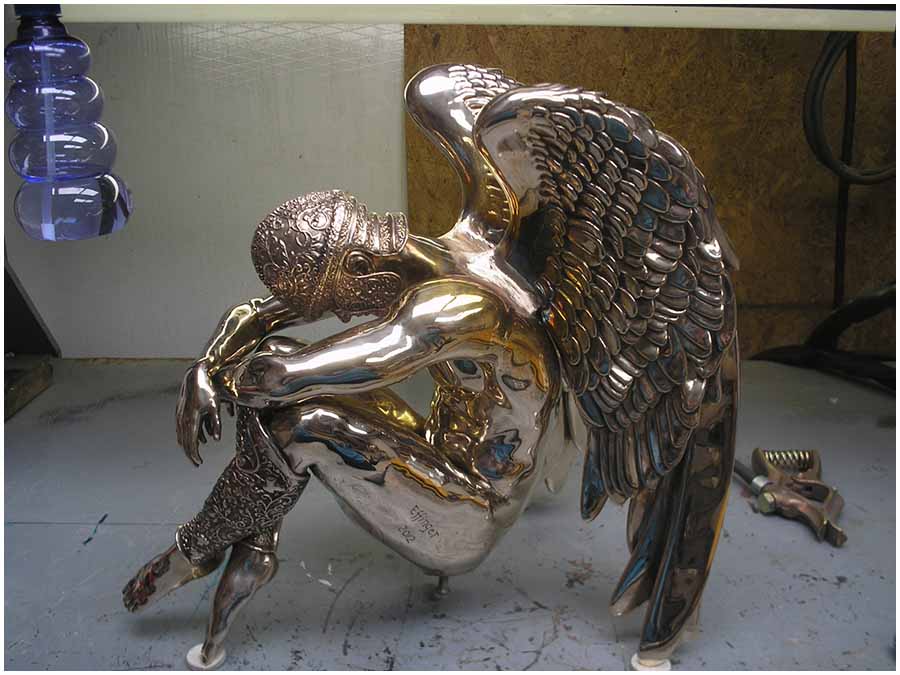
Polishing
Below is some of the initial polishing on the body using rouge and a high-speed buffing wheel. Bronze shines so beautiful, but oxidizes so quickly.
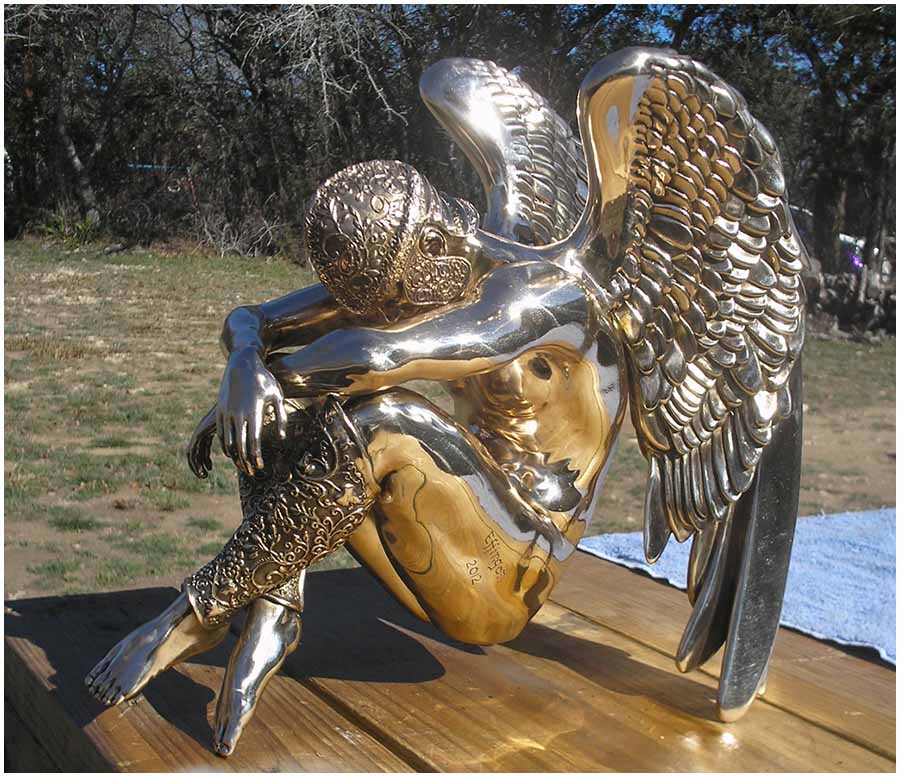
Below the wings have been welded on and chased.
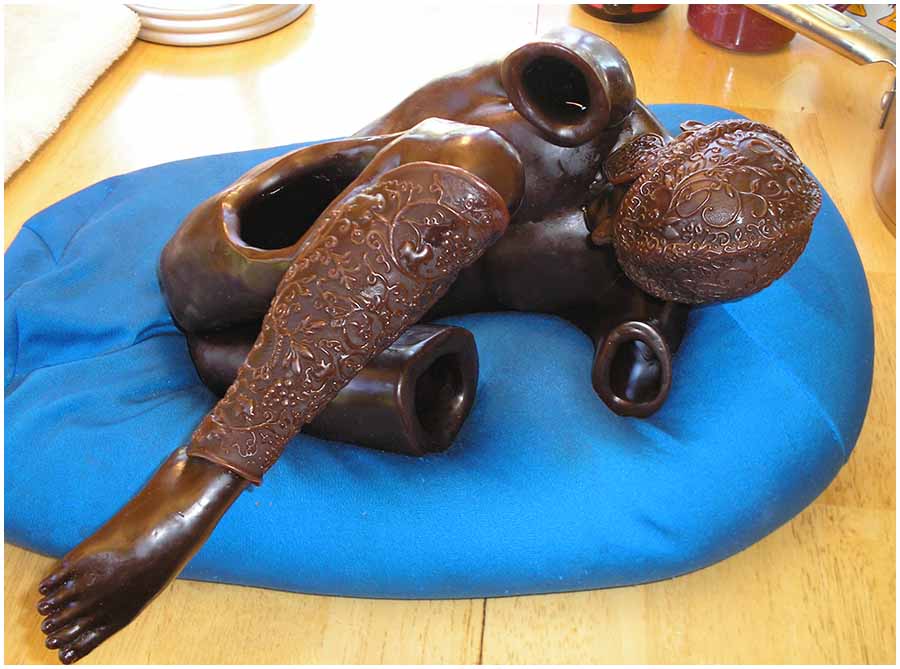
Patinization
Patinization is the application of chemicals that react with the bronze to achieve color. This is a highly skilled art, with many different techniques, such as hot, cold, or fumed patinas - often involving a multitude of toxic recipes. Sculptures displayed indoors and outdoors generally require different patinas. The patina can make or break a sculpture, and is about as important as the subject matter itself. I was planning to patina Volnus, but after the initial polishing, I liked it so much as is, I decided to just lacquer and wax the bronze to seal it. The finished sculpture is sometimes sealed with lacquer and almost always waxed to provide a beautiful protective barrier that should last for years to come. The polished bronze has just been laquered in the photo below.
Mounting
A base of fine wood, marble or granite is usually chosen to display the sculpture. The base is often drilled with holes and countersunk to allow screws to fasten the bronze to it and the bronze is also drilled and tapped to receive the screws. Sometimes the sculpture is set on bearings for fully rotatable viewing. Below, I fastened my finished bronze sculpture to a fine black granite base using two 1/4" bolts I tapped into the buttocks.